- You can watch the tutorial video and follow the text version below.

1. Prepare your ACharacter

Make sure your Character blueprint or C++ has these components added:

  • AnimationDrivenComponent – For listening to animation montage data and signaling it to other systems (e.g., gameplay abilities)
  • ComboManagerComponent – For managing the combo graph

IMPORTANT!!!

For GAS Users

  • Make sure your Character has AbilitySystemComponent and is derived from UContextAbilitySystemComponent.

  • See ComboBasicCharacter.h for a default GAS implementation.

  • Or you can read the GAS installation guide here: Installation doc


For Generic Users

Add the GameplayTasks component to your Character’s Blueprint to use GameplayTasks.


2. Create a Combo Graph

  1. Create the Combo Graph Asset. This is where combat designers primarily work.
    It stores the full combo tree with branching and variations.


  1. Right-click on the graph to open the node creation panel.
    Focus on:

    • Input Branch (green node)
    • Execution Node (red node)

    More node types are covered in the 🧊 Combo Graph Nodes section.


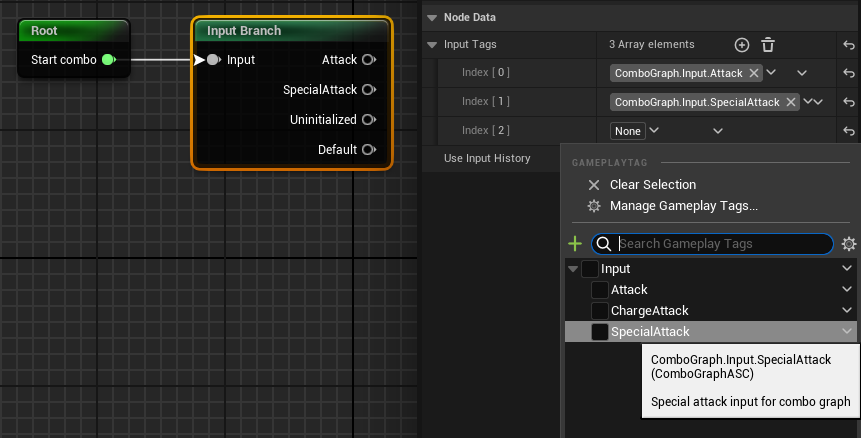
3. Create an Input Branch and connect the Start Combo pin from the Root node to the Input pin of the new branch.
This marks the entry point of your combo.


  1. Click the node and configure it using the Node Data panel.
    Specify which input (via Gameplay Tags) triggers the next combo step.
    Tags must begin with ComboGraph.Input (e.g., ComboGraph.Input.Attack).


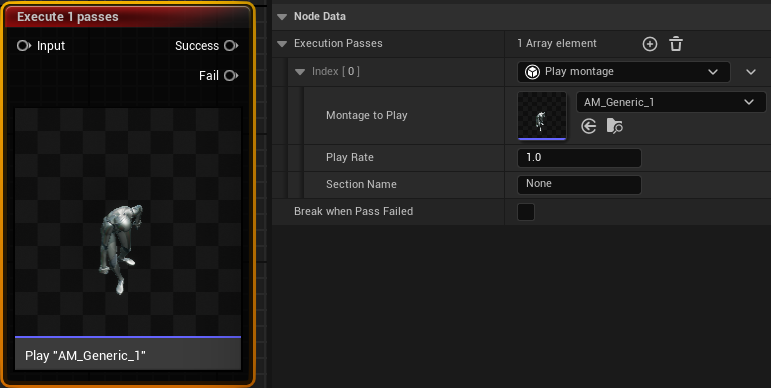
5. Create an Execution Node and connect it to the previous Input Branch.

  1. Add an Execution Pass (e.g., Play Montage) and assign your chosen animation montage.


7. Repeat steps 4–6 to chain additional combo steps:
Root → Input → Execute (Combo 1) → Input → Execute (Combo 2) → …


3. Prepare Input

How to create a new input and hook it to the Combo Graph


4. Setup Combo Graph on Your Character

  1. Open your ComboManagerComponent settings and add a default Combo Graph:
  2. Select your Combo Graph asset.
  3. Select the appropriate graph instance:

IMPORTANT!!!

For GAS Users

Use ComboGraphInstance_ASC


For Generic Users

Use ComboGraphInstance_Generic

Grant combo graph in runtime

Swap between combo graphs

There can only be one combo graph activated per Character / Combo Manager. To switch the active combo graph in runtime you can use the node below.

💡 Tip:

  • GetCurrentInstance return the current instance but you can add an offset index +1 or -1 to grab the left or right graph instance in the list.
  • If you need to grab an instance with a specific graph asset use GetComboGraphInstanceByAsset function

5. Prepare Your Montage

We use animation-driven design: static data is stored in animations and triggered via Notifies.

  1. Open the montage used in your Combo Graph.


2. Add these three Notify States:

  • Block Proceed Graph: Prevents combo continuation until it’s done.
  • Input Window: Enables player input capture for the next combo.
  • Damage Notify: Triggers hitboxes.


3. Use plugin-provided Notify States:

Hitbox Detection (works on all modes):

  • ADNS_Damage_LeftFoot
  • ADNS_Damage_LeftSword

IMPORTANT!!!

For GAS Users

  • ANS_GAS_InputWindow
  • ANS_GAS_ComboWindow


For Generic Users

  • ANS_Generic_InputWindow
  • ANS_Generic_ComboWindow

6. Implement Hitbox & Damage

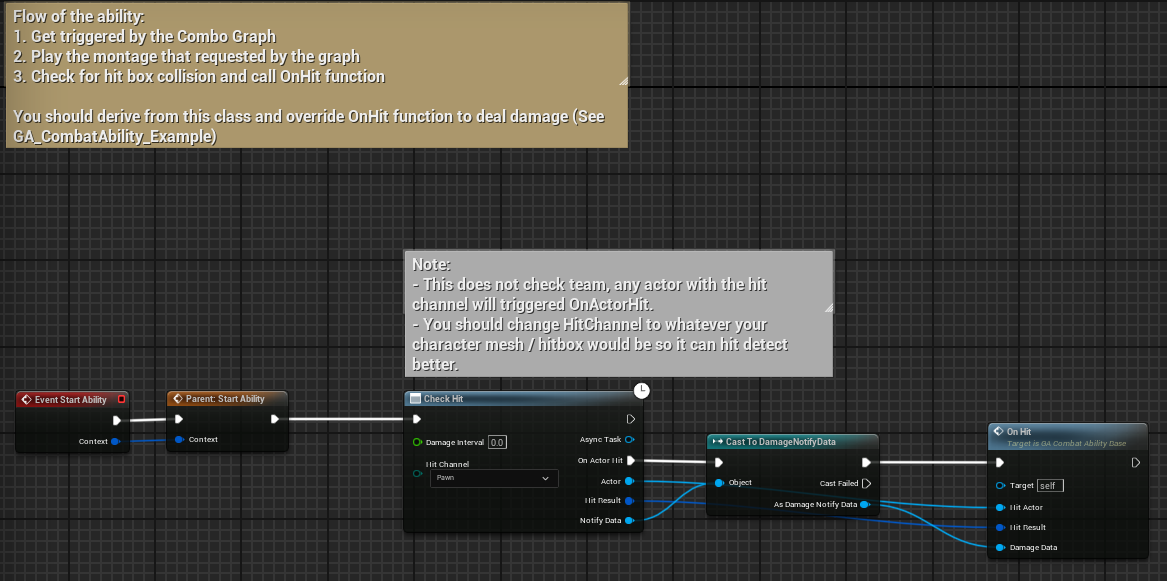
The plugin provides built-in collision detection for both GAS and non-GAS setups.

IMPORTANT!!!

For GAS Users

Use the GA_CombatAbility_Base and override the OnHit function to handle hit events.
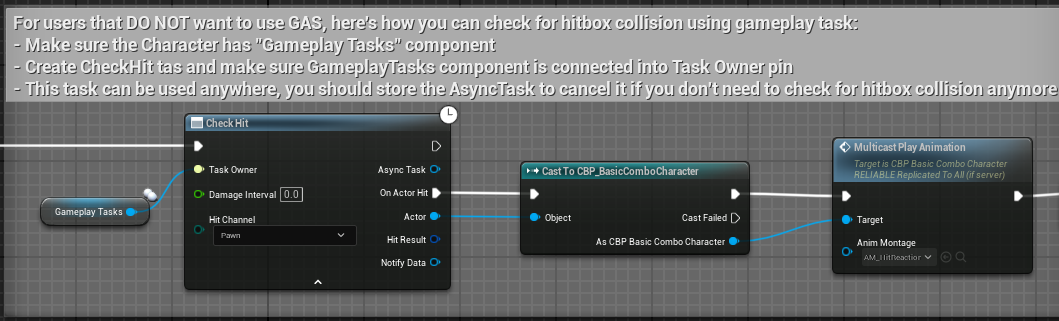

For Generic Users

Refer to CBP_BasicComboCharacter → BeginPlay for a complete example.

It’s the same as when using GAS but instead of using AbilityTask, you’ll implement hit logic using GameplayTask from your character or component blueprint.